Craft of the Month: October. A lesson on timing and learning to start over

Wow – I can’t believe September came and went, and apparently so did October?!

You may notice that I did not craft in September. Well, here’s why: September was filled with Jewish holidays (yum), celebrating my 25th birthday (3 times), and so on and so forth. I’m spoiled and lucky to have family and friends willing to spend almost the whole month reminding me that I turned a quarter of a century years old. It’s not the best excuse, but please accept it as best you can for now.

Now let’s get to October. This has been an interesting month for me. It started with a piece of seaglass. It’s a really unique shape, a beautiful frosted white, and I was inspired to make a craft that showcased it appropriately. I had this grand idea to somehow encase it in a shadow box with cool strings going every which way but the seaglass still floating, you know what I mean, right?

photo 3

In between all of that, I got to go on a surprise “working” vacation on a cruise to the caribbean! I certainly can’t complain because this so-called work required me to sit on a beach with a camera in my hand and run around with a clipboard (and for those of you who know me, put a clipboard in my hand and I’m as golden as the pot at the end of a rainbow). But that took up a significant portion of the part of October I set aside to do my craft. As such, in a rush to try and get something out before the end of October, I learned two tough lessons:

1) Have a back-up plan. If you run out of time to do something elaborate, what’s the back-up, simple craft you can do in the meantime? I started doing the #FMSphotoaday schedule, and stopped while we were on vacation, but if you follow me on Instagram you can check out my photos!

2) Be okay with not having a solution. Below are some photos of the attempted string-work as I’m calling it, and you can see, I haven’t been able to figure out how to make this craft work. Not enough glue in the world is making this seaglass float the way my brain is envisioning it. But, that’s okay, I’m learning. I’m not giving up on this craft, I’ll make it happen somehow, it just may not be in the month of October. Perhaps I will even encourage myself to do TWO crafts in November as a result :).

photo 1 photo 2 photo 1 photo 2 photo 3

I’m upset I don’t have more to share, but I’m not ashamed. I’m new at this, and sometimes you can’t get it right, right away.

Until next time!

Craft of the Month: August

Well, it’s that time of the month again! Time for crafts, pictures, and a few anecdotes. This month was particularly special for me, as it was the first time a friend (autocorrect: my boyfriend) asked me to do a craft for them. So with this added pressure, I had to come up with something even more unique and my OCD definitely took hold. There were a lot of edits throughout the process, which I think makes DIY even more fun.

The project came about when my boyfriend mentioned how his apartment door needed a new paint job after 5 years of in and out, kicking the door closed because his hands were full of groceries or what have you. He mentioned it would be nice to have some kind of inspirational quote greeting him each morning, reminding him to start the day off on the right foot. We decided on “Do something amazing today” as the main quote and I added on from there.

Craft of the Month: August Edition

Craft: Inspirational quote painted on a door
What you’ll need: 
– Paint: Base paint, and two colors of accent paints. I used black, white, and gray, all found from Home Depot.
– Paint brushes – Medium, Small, and Extra Small brush sizes for painting small letters
Stencil paper (similar)
Xacto Knife and cutting board
– A preferred font in mind. Print out all letters in the quote on printer paper in order to make stencils.

Step 1: Make stencils

1. Print out your quote on regular printer paper.
2. Cut out letters using Xacto knife.
3. Place them over the stencil paper and trace the letters accordingly.
4. Cut letters out of Stencil paper.

photo (4)

Step 2: Paint base coat on door
– Nothing really special here. Paint the door with primer/top coat white. 2 coats should do here.

Step 3: Align stencils
1. Start with your anchor word. I chose “something” as it was the longest. Using a straight edge ruler, align the stencils on the door until you’ve got all of the laters placed just so.
2. Paint the first word, let it dry, paint a second coat.
3. Follow the same steps for surrounding words. I chose to get the full quote “Do something amazing today” on the door first, and then added the highlight words later on. A couple of things to note here: not all stencils are perfect! It’s okay if some paint falls out of the lines, you can always do touchups in the future. Next, if you’re using letters that have an inner circle, make sure to keep the stencil connected and you can go back and paint in the circle later on, too.

Honestly, typing out a step-by-step here doesn’t seem to do this justice. It was a very fun project, but definitely takes a lot of quick thinking as you go along. I constantly readjusted letters and made decisions as I saw how each word fit on the door. So, rather than spend time trying to detail each step, my boyfriend (content creator and video making extraordinaire,) made an awesome timelapse of the project, and I’ve included more images below. Hope this gets you started!

VIDEO:

IMAGES:

IMG_2027 IMG_2029 IMG_2030 IMG_2031 IMG_2032 IMG_2034 IMG_2036 IMG_2039 IMG_2040

Craft of the Month: July

Hello friends!

Happy belated 4th of July to you all. Did you celebrate somewhere fun? I hope so. I hope you got to go to the beach and swim in the ocean and scream USA! USA! USA!

No? Well…fine. Maybe that was just my day.

This month, we’re taking the crafts down off the wall. If you didn’t pick up on my love for Home Depot from last year’s April Showers post, well you’re about to hear more. Chevrons, hexes, and string bracelets are everywhere now, so it seemed like a good idea to give it a try myself. AND – bonus: I get to use leftovers from a previous craft! Zing!

Craft of the Month: July Edition

Craft: Twine and Hex braided bracelet
What you’ll need: 
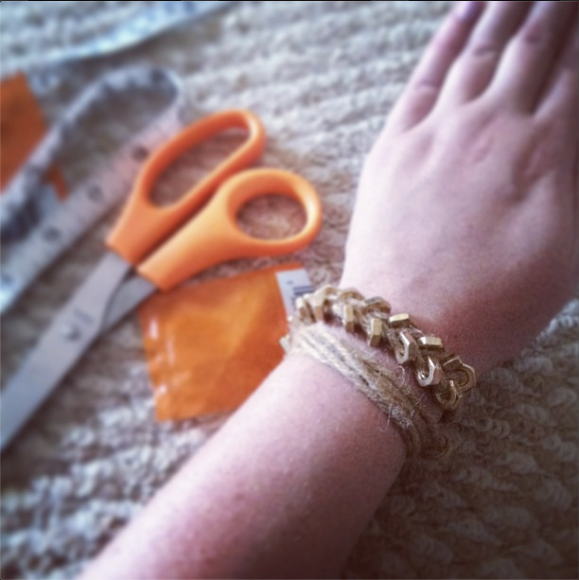
– Twine: size here can vary, as can color. The original design called for white rope, but as mentioned above, I was feeling resourceful so decided to use the leftover Twine I had from my inspiration wall. You need enough for 3 strands at 1 yard a piece.
Gold Hex Nuts (similar)
– Scissors
– Tape measurer

1. Tie a knot about 2 inches down from the top of the 3 strands. You’ll use this to anchor the braids.
2. Begin braiding the twine as you would a normal hair braid (not a fishtail, folks, just a regular ol’ braid).
3. About 1 inch of the way down, you can start adding in the hex nuts. Slide a hex nut onto the left most string and hold it at the top with your thumb and forefinger. Then, loop that string into the center. Slide a hext nut onto the right most string and hold it in place, loop the string, and repeat on the left and right sides until you’ve added all 18 hex nuts.
4. Continue to braid the twine for 1 inch at the bottom of the hex nuts.
5. Tie a know to close off the braids.
6. The bracelet should wrap around your wrist a few times, and then you can tie it off.

I’ll admit this month I slacked off on the picture taking, but here’s the final result!

Screen Shot 2013-08-28 at 11.32.51 AM

So that’s it guys, short and simple this month. See ya in August!

Craft of the Month: June

June was a whirlwind of a month. Summer was heating up (yeah, I did that) and I transitioned into a new job at a brand new startup here in NYC. My 5 day staycation was the perfect time for my monthly craft. Full disclosure, I found this craft on Pinterest, so I can’t take all the credit for creativity, but I definitely had to use all parts of my brain to come up with color blocking and layout ideas. So without further ado, I give you June’s Craft of the Month.

Craft of the Month: June Edition

Craft: Crayon Art
What you’ll need: 
Stretched Canvas: Comes in many shapes & sizes. I recommend Studio canvas as it’s not too thick and hangs on the wall easily (plus, it’s the cheapest!). Choose your sizes based on the space on the wall.
– Crayons. Lots and lots of crayons.
– Hot glue gun + glue sticks
– Hairdryer or heat gun
– Newspaper
Time: 2 hours for a large canvas, 1 hour for a small canvas.

These are great pieces to brighten up any living space, a children’s room, or in my case, my “dining” room.

Step 1: Sort Crayons

– It’s really important that you pre-sort all of your crayons before you start working. First, you’ll need to make sure you have enough of the colors you’re looking for (apparently: not all Crayola boxes are made equal). Second, it will make the gluing process that much faster if you sort and order the crayons beforehand.
– If you’re using a white canvas, I recommend getting rid of the white/tan/brown/black crayons. They aren’t as vibrant – unless you’re going for a muted tone.

Step 2: Align crayons to canvas
– Again, you want to make sure you have enough crayons to fill the space and it makes the gluing process clean and simple.

Step 3: Glue crayons

– Make sure you leave ample time for the hot glue gun to heat up. Patience is key. The crayons ultimately stay on the best if the glue is hottest!

– Draw a few lines of glue on the canvas directly. It makes it easier to place down a few crayons at a time and line them up accurately. It might take a few tries to get the spacing down, but having a little bit of extra glue here and there never hurts.

– Glue the crayons to the canvas with the name of the color facing out. It’s consistent, and easy to make sure the colors are in the right fade-order.

photo 1photo 2photo 3


Step 4: Melt Crayons (Say it with me – MELT THE CRAYONS!!!)

– If you’re using a hairdryer, make sure it has the nozzle attached. Hold the hairdryer about an inch or two away from the crayons. This way you avoid the crayons spraying every which way and can guide the direction of the melting.

– Start with the hairdryer in the middle of the crayon. You’ll notice that the paper will start to darken as the crayon sweats and begins to melt. As it melts down the canvas, the longer you hold the hairdryer on the crayon the more texture and wax you will see.

– For the large canvas, I didn’t want the crayon to melt all the way to the bottom, but for the smaller ones, I felt it made more of an impact. Again, this depends on the style you’re going for, so play around! You can always melt more later if needed.

Final results:

photo 1

photo 2photo 3photo 4photo 5

Craft of the Month: May

Alright folks, I’m back in action. I’m aware that I may have jumped on the “I started a blog” train too soon. But, you live and you learn right? My love for a semi-designed life hasn’t disappeared, rather it needed refocusing. After countless complaints to my boyfriend about how I was using only half of my brain and was missing out on being creative, I came up with a plan. One craft a month. It wasn’t overly ambitious and gave me some wiggle room when the summer took over my social schedule (to quote a friend: “I’m busy.”) and when I was feeling too lazy to navigate the aisles of the craft store. The idea was that I’d dedicate a weekend or a few nights out of a week every month to harness my creativity and make a craft – and see where it took me.

Then, I’d blog about it. We’ll see how this goes! Welcome aboard…again.

Craft of the Month: May Edition

Craft: A wall of inspiration and Instagram makes homey wall art.
What you’ll need: 
Twine: size here can vary, but I found this to be the perfect width!
Clothespins: you can also find these at your locale Duane Reade – or a similar drug store of choice.
– Recollections (TM) canvas scrapbook paper: purchased in-store from Michaels
– Sharpee(s)
– Printed photos, I used Prinstagram.
3M Adhesives
– A list of your favorite quotes!
– Superglue  (or clear Elmer’s glue)
Time: If doing this in one day, I’d budget at least 3-4 hours.

I wanted to show off my favorite quotes and my top/coolest Instagram photos. I started with the quotes:
1. Each friend represents a world in us, a world not born until they arrive, and it is only by this meeting that a new world is born.
2. Good skill (thanks for this one, Dad)
3. Don’t wait for epiphanies.
4. Love someone every day
5. Live your life (OK, I took this from Rihanna)
6. Eat good food
7. Eat dessert first
8. Life isn’t a track meet, it’s a marathon

I played around with a sketch pad trying to figure out how I would draw the quotes. I’m not an illustrator by any means so I figured it was best to practice first. After determining which quotes would work best on paper and playing around with fonts/styles, I cut the canvas sheets into squares and started doodling. I ended up only using 4 out of the 8 quotes I wanted, mainly because I ran out of space on the wall and didn’t want to overdo it. Here’s how they turned out:

photo 2 (3) photo 3 (2) photo 4 (1) photo 5

I only took pictures once I had already hung them up, so I guess that’s a great segue into physically hanging up the wall art.

1. Measure the space on the wall you’d like to use.
2. Cut a piece of twine that is 8 inches longer than the space. This leaves you with an inch or two on each end to tie a knot/bow, as well as space for the twine to sag between each clothespin.
3. Tie a bow around the angled side of the clothespin.
4. Attach 3M Adhesive to flat part of clothespin.
5. Stick clothespin to wall – hold for 30 seconds for ultimate stickiness.
6. Hang one quote on the ends, or pictures on each end.
7. Stick/hang one clothespin in the center of the string.
8. Start adding quotes/pictures!

Here’s how it ultimately turned out:

photo 2 (4)

It’s the perfect combination of cutesy, arty, and fun and hangs above my bed so that I feel inspired and peppy when I wake up each morning.

Until next month…

Seeing Double

It’s happened to all of us at one point or another. You get your first car, and think it’s “like, sooo, cool! and no one else has it.” And then all of a sudden, you see your car everywhere. I mean, everywhere. It seems like all of a sudden everyone else realized how cool your car was and bought it so they could be like you. At least in my head that’s how it goes.

Until you start to really think about it and wonder, have I simply not noticed how many other people drive the same car? I call this phenomenon Seeing Double. In life, this doesn’t just happen with cars. Exception: just last week my dad purchased the same exact car my mother has, but in black (mom’s is white). So now when I look in the garage, I really AM seeing double. Second exception: post-my move to New York City, my wonderful parents decided it was time to sell my car, so I will no longer experience this with Giselle. Here’s my parting moment:


But I digress.

What I really want to talk about here today is how our brains are designed to pick and choose what stands out to us every day. Last week I went to Chelsea Market for the very first time. If you haven’t been, I highly recommend it. There are so many options of foods to consume, ranging from savory to sweet, grocery items to fine dining. We ate at Friedman’s Lunch for dinner (not an oxymoron…) where they served the most interesting ketchup I have ever tasted. I know what you’re thinking…”it’s just ketchup, move on!” But for someone who spent a large amount of her childhood putting ketchup on everything, this was a big deal. It’s a brand called Sir Kensington, which is what I’ll name my first Frenchie puppy. Anyway, it tastes like a creamy marinara sauce combined with barbecue-like spices. Truly truly delicious. We actually had a pretty decent conversation revolving around the ketchup – if you’ve never met me, I promise you the evening was spectacular and that I’m super exciting and always have the most life-changing conversations. Man, someone needs to keep me on point in this blog post today! Come on, people!

Then the very next day, on my way to work, I walked by this:

My mind was blown. How long had those been posted, and had I really not noticed? You would think I would have seen a wall of ketchup, but who really knows? I will always question whether I am blinded by unfamiliar items, or if life is just one big coincidence.

Some other examples of Seeing (or smelling, or hearing) Double:

– Perfumes/Colognes (Marc Jacob’s Daisy, anyone?)
– First Dance/Kiss/Bar Mitzvah Theme/Wedding Songs
This rug

That’s all for this week, friends. Sorry it’s been a while, but keep checking back for more!

Stay cheesin.

An Experience in Eataly

I’ve always been interested in how architects and interior designers choose layouts for stores.  Specifically, stores that are multi-purpose. By that I mean bookstores that are also cafes, the Costcos and Wal Marts of the world, and today specifically, a store that encompasses restaurants (yes, plural), a grocery store, and boutique shopping all in one. I am talking about none other than the wonderful creation of Mario Batali’s Eataly.

Here we have what feels like a combination between a landing zone at Disney World and a teleport to Italy itself. Let’s break it down into factors of the design I find so intriguing:

1. The Layout

Wrapping around the corner of 5th Avenue and 23rd Street, the flow of the store forces you to stop and take in each department due to its very narrow entrances that expand as you travel towards the back.  If you enter on 23rd, there’s an immediate desire to pickup fresh produce or run straight for the salami counters. If you enter on 5th, you are drawn to join the lines of the Gelateria and pastry shop.  If you have the mental strength to keep moving, you are rewarded as you happen upon the Fish Monger and cafes, all leading back to the amazement that is homemade pasta and pizza.

2. What Flies Above

I admit it’s difficult to peel your eyes away from all kinds of food that meet you at eye level, but if you take a moment and just look up, you’ll find each shop supports very different kinds of lighting and art.  It ranges from black and white pictures of olden-days in coffee shops (brought to you by LaVazza), to fiery chandeliers, to beautifully hand-woven flags. The designers obviously took great care in making a point that each shop is its own entity within this great place.


3. Product Displays

Moreso than a regular old grocery store, the way Eataly displays its products truly amazes me. You wouldn’t think that ordinary white shelves would evoke such a response, but there’s something in the way the signage takes your eyes from the top shelf down, one layer at a time, linking each food to a sauce or each spread to a bread (rhyme not intended), that is beautiful. They make you stop, read, pick up a jar, contemplate how you’d use it, replace (or add to cart to purchase), and repeat. How I left without purchasing an entirely new set of sauces and spices still baffles me.

I should also note that once you’ve reached the homemade pasta and sauces section all hope is lost.  You can tell instantly how fresh these pastas are, even though the descriptions are all in Italian! Luckily the sauce aisles explain which flavors to use when, but that just makes me want to test them out on pastas I can’t even pronounce. Dear food gods, please help me, I’m trapped in pasta heaven and I’ve just broken Passover!

4. Products I Want to Own

I stumbled upon a few products that were displayed so perfectly and eye-catching that I had to stop and admire. I guess that’s the point of any display, right? Regardless, these specifically made me stop, look, and snap a photo.

First, there was this rack of flavored goodies: figs, cherries, and ginger all ready and able for consumption. The face that I could purchase 1, 5, or 10 of each of was so appealing to me. And, the colors of the figs and cherries matched perfectly with the wooden shelves. The whole thing was very rustic amongst a sea of white decor.

Then I spied these jars of olive oil.  Mom always said the darker the bottle, the better the quality. I can’t imagine how smooth and pure this must taste. These bottles look regal.

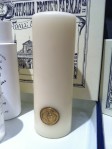
That’s when I turned around and walked into the Health & Beauty department (yes, there’s one of those too)! I stopped and smelled the candles, and immediately fell in love with this one. Not only does it match the decor on my shelves full of West Elm trinkets, but it also smelled divine. It was pomegranate flavored, but also had a very warm vanilla after-smell. The gold stamp adds a unique touch and also makes it look, well, regal! Sensing a pattern here? That was when I saw the candle alone was $80. As sad as I was to pass it up, I can surprisingly still smell the scent on my hands. Hopefully it lasts for a while.


5. CHEESE. Cheese. CHEESE!

And so we have come to the part of this post we have all been waiting for. The displays of cheeses at Eataly are immaculate. First, there is the pre-packaged, refrigerated cheese section. There you find white cheese, bleu cheese, red cheese, yellow cheese! Cheese with names like Guffanti and Caciocavallo Irpino. Cheese that costs $30 a pound. While there was nothing too special about the design of this section, it acts as a nice Welcome Mat to the fine cheese department that lays just past it.

This cheese department invites you to pair each tasting with a tall glass of wine, which on a lovely Sunday afternoon I was very tempted to do. But I had to focus on the goal at hand: look at cheese. Wheels of cheese serve as the base for hand-carved sections of every single flavor of cheese you could possible imagine. If you’re not already drooling, I don’t know what else to tell you. I was overwhelmed at the number of cheese selections, but also found it very easy to navigate my way through my tastings (oh yes, I had to taste a few). They were delineated by Cow’s Milk, Sheep’s Milk, area in Italy they came from, and measure of intensity. What an amazing set of organizational skills these folks have! A+ to the person who is that much of a perfectionist. I tip my hat to you.


As you can see there is much to be seen, much to learn, and very much to enjoy at Eataly. I highly recommend taking some time to explore the twists and turns of the store and finding your own design-spriations. Look up, look down, look everywhere! Will it be the tiled walls, the cafe seating, the grocery carts made out of recycled bottles? I’d love to know! Share your thoughts with me.

Until then, Happy Cheeseday.

April Showers bring… sawdust.

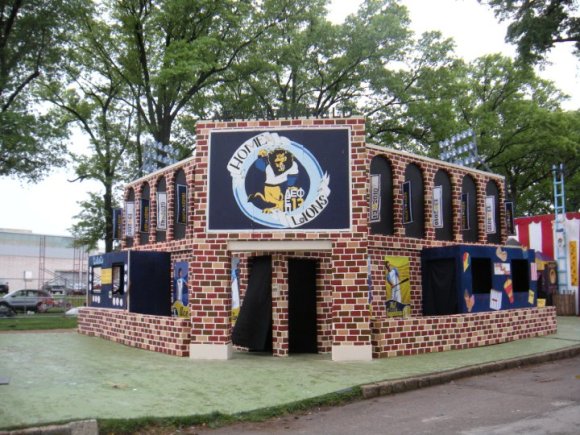
When I was in college, the month of April revolved around one thing: ThurtenE Carnival. During this carnival, each sorority was paired up with a fraternity, and after months of planning, designing, architecting, writing, rehearsing, and not sleeping, the two teams worked day thru night to build a house, put on a play, and raise some money on the side.

Basically, we turn this:

Into this:

And finally, into this:

It was during this season that my creative juices were flowing freely and I got to be covered in paint and sawdust, and walk around with nails in my shoes and no one could judge me! OK, I judged myself a little bit for the lack of showering that took place, but when you’re sleeping in your car for an hour a night you need to pick and choose your priorities.

We created these “facades” as we called them using Google SketchUp and the help of my dear friend Larry at Home Depot in Clayton, MO. And for just this brief period of time, I got to play architect, interior designer, contractor, manager, and painter. It was perhaps the most exhausting and truly fulfilling month of my life, every year.

I found myself thinking back on ThurtenE Carnival yesterday while contemplating this next post. I have this urge to build something, paint something, or chop something up. Because I now live in a studio apartment no bigger than a normal living room, chopping up wood releasing mounds of sawdust is certainly not my best option here. I wonder if I had the space, time, and equipment to build something, what would it be? For a period of time I wanted to pick up and go work with Habitat for Humanity and build houses. Perhaps I still will do that one day.

The point is, creativity and design come in all forms at all stages of life. I wasn’t always behind the computer screen creating graphics, and even though my desire to create right now is in the digital space, I can’t help but appreciate the different ways I was able to use creative design in my hobbies as well.

– Happy Cheesing.

It’s like riding a bicycle?

I know you’re all wondering what brought me back to the design-world. Truth be told, I never really left. Let’s just say I went on sabbatical. I did many one-off design projects during my college years, including T-Shirt designs for sororities, fraternities, student groups, and logos for student-run businesses or local promotions. I loved those projects and wish I had dedicated more time to finding a “client base”, if that can even exist in college.

After graduation, my time was mostly focused on finding a job, moving into my first apartment, moving into my second apartment, moving up to my third apartment in New York City, and starting another new job. The past 2 years (pause: take a moment to reflect on the idea that I’ve been out of college almost 2 years. WOW.) have been a constant series of events that in one way or another prevented me from connecting with my creative side.

I began feeling the itch when my coworkers in Baltimore realized I knew my way around Photoshop and Illustrator. It started with small projects, a postcard here, a flyer there. Then, one day last summer, my boss approached me with the opportunity to design all of the print materials for the company’s Annual Meeting. This included the invitations, sponsorship proposals, signage, programs, flyers, and the Annual Report itself. This was a huge undertaking, and while it wasn’t necessarily part of my job description as an event coordinator, I was honored to showcase my work to over 500 of Baltimore’s highest business executives.

A friend then recently asked me to help him with a logo for his vlog, 90 Second Love. It was a quick and easy project, but one that struck a nerve. Suddenly I felt the need to make logos for everyone! Logos for all! He kept telling me I should start a blog and showcase designs I’ve done. But I didn’t really want to resurface designs I did in college. Still, his encouragement definitely got me thinking of what I would want to get out of a blog. I wanted to start fresh and do NEW things! So here’s my attempt. Do you need a logo designed? Do you need some graphic assistance? Leave a comment! Email me! Call me! Let’s be friends.

To recap: I’m re-entering the design realm. I’ve been told it’s as easy as riding a bicycle. But if you know me at all, you know that me + bicycle does not equal easy, and that’s a story for another time. For now just wish me good skill!

– Just keep cheesin’. Or designin’.

Hello Blog, I’m Alexa.

Well, it’s happened. After months of witnessing friends, coworkers, parents (whattup Schmad), and what seems to be the rest of the twenty-something generation start their own blogs, I’ve finally found the inspiration to put my thoughts down on paper out into the interwebs.

I never thought I’d start a blog because I wasn’t sure I had anything interesting to say. Who wants to read about what inspires me? That’s when I wondered… “well, all blogs are about what inspires people in some way, right?” So, before I get started. Before you get sucked in. Before you find yourself wondering “where did this woman come from?!?”  I’ll tell you. This blog is going to be about the little things in life that inspire me. Mainly, awesomely designed graphics I see around, designs I get to do for my friends, or meals (that include cheese) that just make me drool on repeat.

You may be wondering how design and cheese go together. I too am wondering how I’m going to pull this off. I have to give credit to my dear friend Marisa Kabas, who not only combined the two ideas as if they made the perfect breakfast sandwich, but who has also successfully taken her blog off of the ground level. I’ve decided that in life you are inspired by what you love (and trust me, no one else in the entire world has decided this before me). And, at this point in time, what I love in my life, is design… and cheese.

So here goes nothing. Let’s see what happy little moments come out of this blog. I hope you enjoy it, and I hope you feel just as inspired to take this journey with me.

– I’m still working on a sign off. One step at a time cheesers. Designers? Designcheesers? I don’t know. It’ll come.